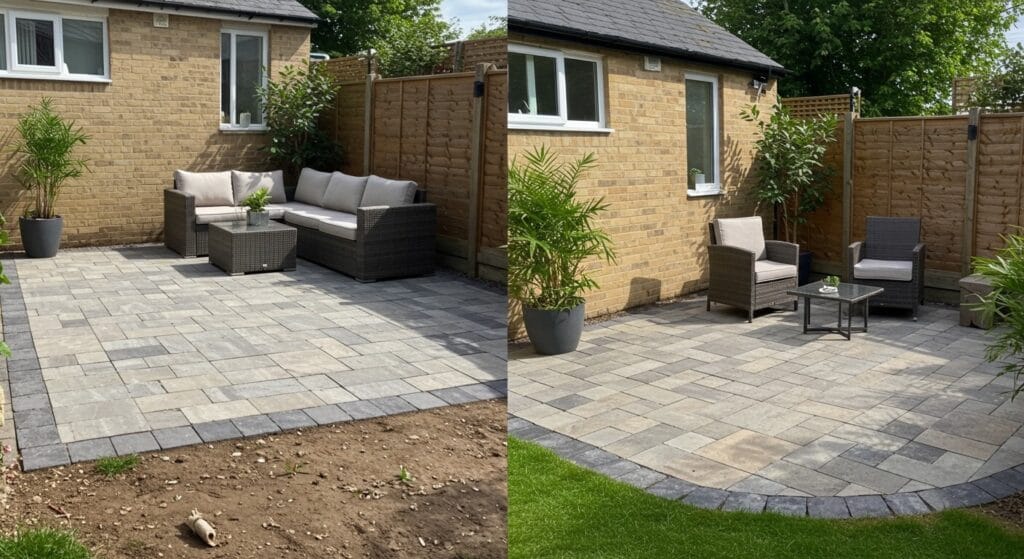
Your small backyard doesn’t have to feel like wasted space. With the right approach, even the tiniest outdoor area can become your favorite spot to unwind after a long day.
A small backyard patio makeover with pavers might seem overwhelming at first, but it’s actually one of the most rewarding DIY projects you can tackle. The transformation is dramatic, the process is manageable, and the results last for years. Whether you’re working with a cramped corner or a narrow strip behind your home, pavers offer endless possibilities for creating something beautiful.
Why Choose Pavers for Your Small Patio?

Pavers bring a level of sophistication to small spaces that’s hard to achieve with other materials. Unlike concrete slabs that can crack over time, individual pavers move and settle naturally with the ground beneath them.
The variety is incredible too. From classic brick to sleek modern stone, there’s a paver style that matches every home’s personality. For small spaces, this flexibility becomes even more valuable because you can create visual interest without overwhelming the area.
Planning Your Small Patio Layout

Before you start digging, spend time really looking at your space. Walk around it at different times of day to see where the sun hits and where shadows fall. This matters more than you might think – nobody wants to sit in blazing afternoon sun or perpetual shade.
Measure everything twice. Small spaces are unforgiving when it comes to proportion mistakes. A patio that’s too large can make your yard feel cramped, while one that’s too small won’t be functional. Most small patios work best when they’re between 8×10 feet and 12×12 feet, but your space might call for something different.
Consider how you’ll actually use the area. Do you want space for a small dining table, or are you more interested in a cozy seating area? Your intended use should drive the shape and size decisions. Outdoor seating ideas can help you visualize different furniture arrangements before you commit to a patio size.
Essential Tools and Materials

Paver patio installation requires specific tools, but you don’t need to buy everything new. Many hardware stores rent the larger equipment like plate compactors and wet saws.
Your material list will include pavers (obviously), sand for leveling, gravel for the base, and landscape fabric to prevent weeds. Don’t skimp on the base materials – they’re what make your patio last. For a typical small patio, you’ll need about 2-3 inches of gravel base and 1 inch of sand.
The tools you’ll definitely need include a shovel, rake, level, rubber mallet, and knee pads (trust me on this one). A wheelbarrow saves your back, and a plate compactor ensures everything stays put over time.
Step 1: Excavation and Site Preparation

Start by marking your patio boundaries with spray paint or flour. This helps you visualize the final size and make any last-minute adjustments before you start digging.
Excavation is probably the most physically demanding part of the project. You’ll need to dig down about 6-8 inches below your desired finished height. This accounts for the gravel base, sand layer, and paver thickness. The soil you remove doesn’t have to go to waste – it’s perfect for filling low spots elsewhere in your yard or creating raised garden beds.
Check for utility lines before you dig. Most areas have a free service that marks underground utilities. It takes a few days to arrange, but it’s essential for safety. Nobody wants to hit a gas line while installing a patio.
Step 2: Creating the Perfect Base

The gravel base is what keeps your pavers level and prevents settling over time. Spread the gravel in 2-inch lifts, compacting each layer thoroughly with a plate compactor.
Don’t rush this step. A properly compacted base is the difference between a patio that looks great for decades and one that starts sagging after the first winter. The gravel should be level and firm enough that you can walk on it without leaving footprints.
Slope is crucial for drainage. Your patio should slope away from your house at about 1/4 inch per foot. This seems minimal, but it’s enough to keep water moving in the right direction. Poor drainage is the enemy of hardscaping projects, so get this part right.
Step 3: Sand Layer and Leveling

The sand layer goes on top of your compacted gravel base. This is where you’ll do most of your fine-tuning to get everything perfectly level.
Use coarse sand rather than fine sand – it compacts better and provides a more stable base for your pavers. Spread it evenly with a rake, then use screed boards to level it perfectly. Two parallel boards with a straight edge pulled across them creates a perfectly flat surface.
Don’t compact the sand layer before laying pavers. You want it loose so the pavers can settle into it slightly, creating a tight fit.
Step 4: Laying Your Pavers

Start laying pavers from one corner and work your way across in a systematic pattern. Most stone patio ideas work well in small spaces, but herringbone and running bond patterns are particularly forgiving for beginners.
Keep pavers tight together – gaps should be minimal. If you need to cut pavers to fit around edges, save this for last. It’s easier to lay all the full pavers first, then measure and cut the partial ones.
Use a rubber mallet to tap pavers into place, but don’t pound them. Gentle taps are usually enough to get them level with their neighbors. Step back periodically to check that your lines are staying straight and your pattern looks consistent.
Design Ideas for Small Spaces

Small patios benefit from design tricks that make them feel larger. Light-colored pavers reflect more light and create an airy feeling, while darker pavers add dramatic contrast but can make spaces feel smaller.
Consider mixing paver sizes or creating a border with a different material. This adds visual interest without requiring more space. A soldier course (pavers laid perpendicular to the main field) around the perimeter creates a finished, professional look.
Curves work surprisingly well in small rectangular spaces. A gentle curve along one edge softens the overall look and can make the patio feel more spacious. Just remember that curved cuts require more skill and time to execute properly.
Budget-Friendly Paver Options
")
Concrete pavers offer the best value for most homeowners. They’re durable, available in many styles, and significantly less expensive than natural stone. Modern concrete pavers can mimic the look of more expensive materials quite convincingly.
Reclaimed brick pavers bring character and history to your space. They’re often available from demolition sites or specialty suppliers at reasonable prices. The weathered look works particularly well in outdoor spaces that blend traditional and casual styles.
Consider mixing high-end accent pavers with budget-friendly field pavers. Use natural stone or premium concrete pavers for borders or focal areas, while filling the main field with more affordable options.
Finishing Touches: Edging and Joint Sand

Proper edging keeps your pavers from shifting over time. Plastic edging works for most residential applications and stays hidden below ground level. Metal edging is more durable but also more expensive.
Joint sand fills the gaps between pavers and locks them together. Regular sand works fine, but polymeric sand hardens when wet and provides better weed prevention. Sweep the sand across the entire surface, making sure it fills all joints completely.
A final compaction with the plate compactor settles everything into place. This step often surprises people with how much it improves the finished appearance – everything suddenly looks professional and permanent.
Maintenance Tips for Long-Lasting Results

Your new patio will need some basic maintenance to stay beautiful. Annual resealing protects pavers from stains and weather damage, especially if you’ve chosen natural stone or concrete pavers.
Weeds can emerge between pavers over time, but regular maintenance keeps them under control. Pull weeds when they’re small, and consider applying pre-emergent herbicide in early spring.
Snow removal requires care – metal shovels can chip paver edges. Use plastic shovels or snow blowers, and avoid rock salt which can damage some paver materials. Sand provides traction without the chemical damage.
Common Mistakes to Avoid
Rushing the base preparation causes more patio failures than any other factor. Take time to compact properly and check your levels frequently. It’s much easier to fix problems during installation than after your patio is complete.
Don’t forget about drainage. Even small patios need proper slope and drainage considerations. Water that pools on your patio will eventually cause problems, from ice damage to settling issues.
Buying too few pavers is a common oversight. Order about 10% extra to account for cuts, breakage, and future repairs. Trying to match pavers months or years later can be challenging as colors and styles change.
Sanjai creates easy, affordable home decor ideas that anyone can try. Through simple tips and curated finds, he helps you style rooms you’ll love coming home to.