Building your own chicken coop might seem like a daunting project, but it’s actually one of the most rewarding DIY adventures you can tackle. There’s something magical about creating a cozy home for your feathered friends while adding functional charm to your backyard. Whether you’re dreaming of fresh eggs every morning or simply want to embrace sustainable living, the right coop design can transform even the smallest outdoor space.
The beauty of DIY chicken coop plans lies in their flexibility – you can customize every detail to match your space, budget, and aesthetic preferences. Small backyards don’t have to limit your poultry dreams, and with smart design choices, you can create a functional henhouse that becomes a beautiful focal point in your outdoor spaces.
Most beginners worry about complexity, but modern backyard chicken coop design has evolved to prioritize simplicity without sacrificing functionality. The key is choosing plans that balance your skill level with your hens’ basic needs: shelter, security, ventilation, and easy access for cleaning and egg collection.
1. Essential Features Every Small Backyard Coop Needs

Before diving into specific plans, understanding the fundamental requirements will guide your design decisions. Every successful coop, regardless of size, must provide adequate space – typically 4 square feet per bird inside the coop and 10 square feet per bird in the outdoor run. This might sound like a lot, but clever vertical design can maximize your available footprint.
Ventilation ranks as the most critical yet often overlooked element in beginner coop blueprints. Chickens produce moisture through breathing and waste, making proper airflow essential for preventing respiratory issues and maintaining dry conditions. Your coop needs ventilation near the roof level to allow warm, moist air to escape while preventing drafts at bird level.
Security features can’t be an afterthought when planning your poultry house ideas. Hardware cloth (not chicken wire) should surround all openings, and the coop needs to be elevated or have a secure floor to prevent predator access. Even in urban areas, raccoons, cats, and other threats pose real dangers to backyard flocks.
2. The Classic A-Frame Design for Tight Spaces
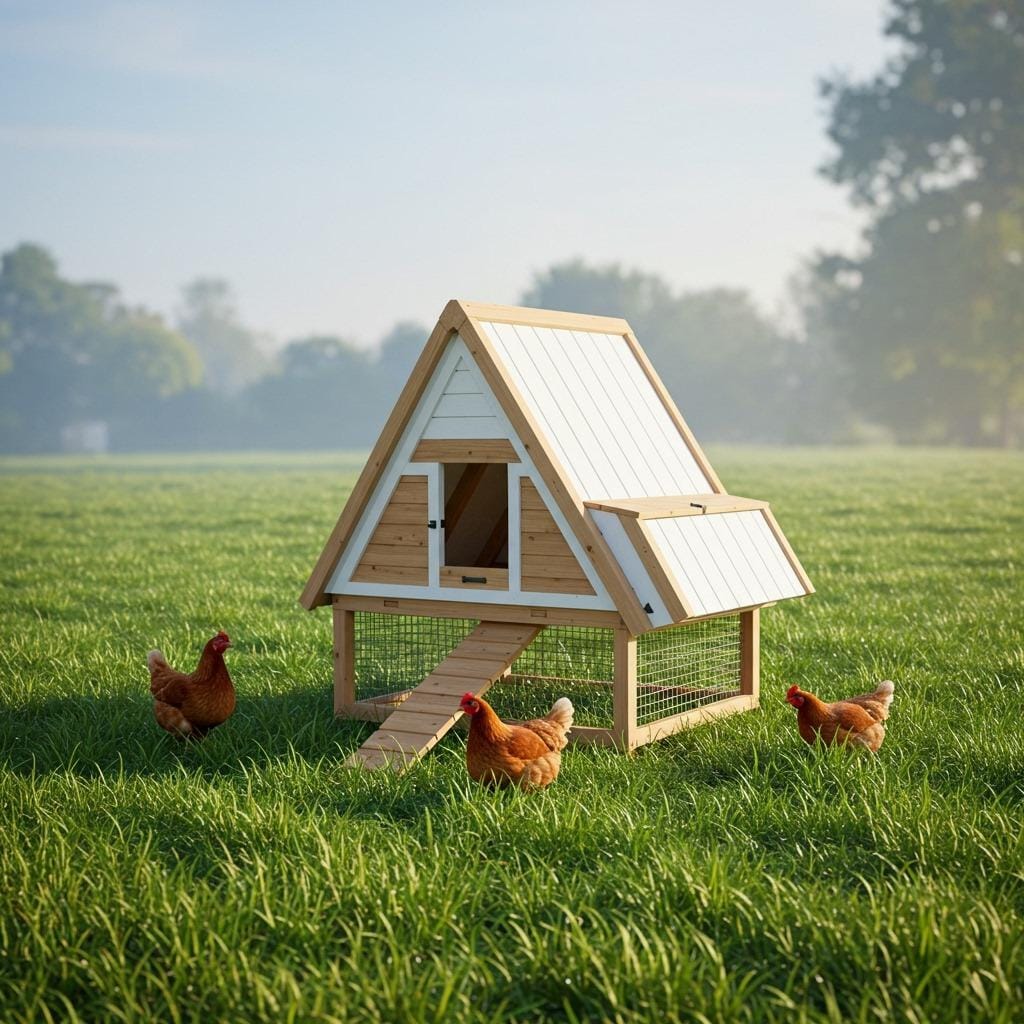
The A-frame style remains one of the most popular choices for small backyards because of its efficient use of vertical space and straightforward construction. This triangular design requires minimal ground footprint while providing ample headroom for your birds and easy access for maintenance. The steep roof naturally sheds rain and snow, making it perfect for various climates.
Building an A-frame coop typically requires basic carpentry skills and standard lumber dimensions, keeping costs reasonable for most budgets. The design allows for creative customization – you might add windows on one side, incorporate a small nesting box extension, or paint it to complement your modern farmhouse exterior aesthetic.
Most A-frame plans accommodate 3-4 hens comfortably, making them ideal for beginners who want fresh eggs without overwhelming commitment. The compact size also means you can potentially move the entire structure if needed, though adding wheels requires additional planning and reinforcement.
3. Elevated Coop Designs with Built-in Runs
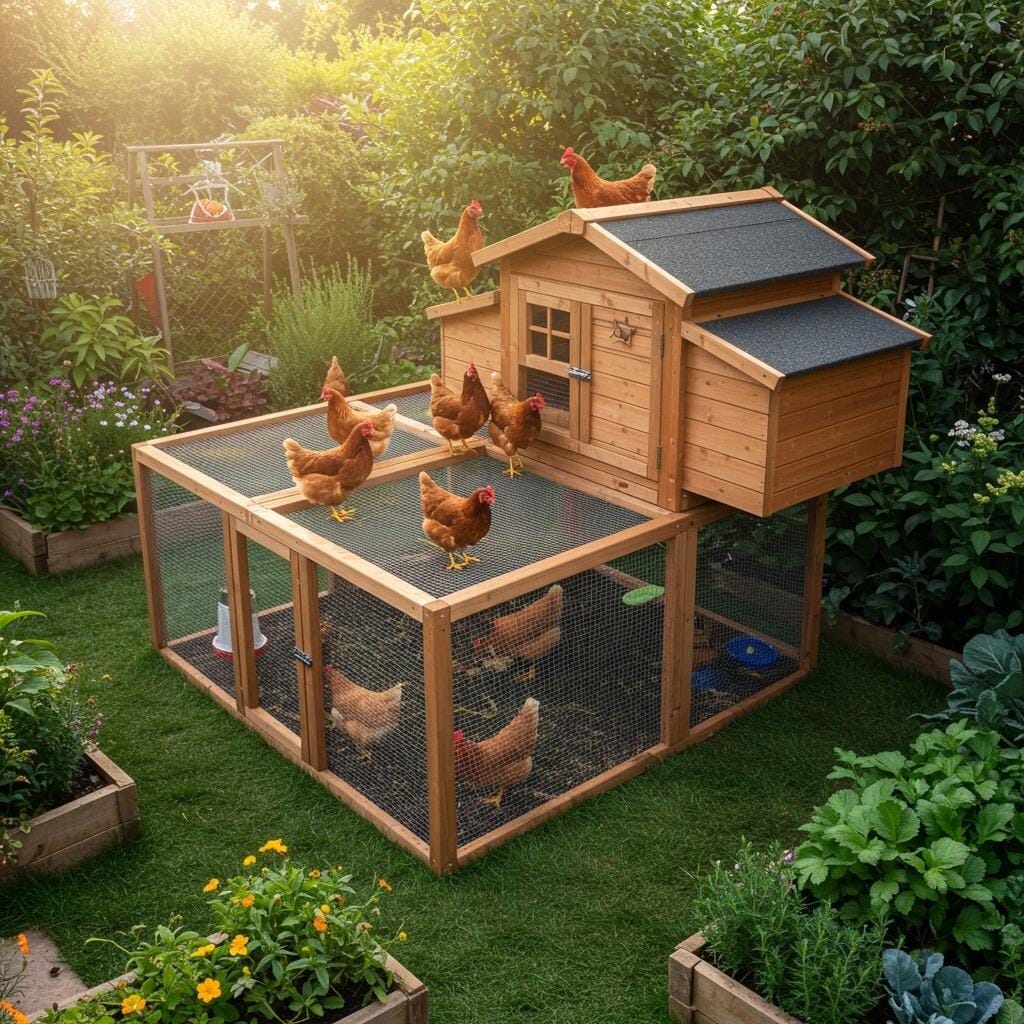
Elevation serves multiple purposes in small backyard chicken coop design, starting with predator protection and extending to better drainage and air circulation. Raising your coop 18-24 inches off the ground creates valuable real estate underneath for your birds to scratch and seek shade while keeping the living quarters dry and secure.
The space beneath an elevated coop becomes natural shelter during hot summer days or light rain, effectively doubling your birds’ usable area without expanding your footprint. This design works particularly well in yards where you want to maintain some lawn space while providing your flock with protected outdoor access.
Construction involves building a sturdy platform first, then framing the coop structure on top. While this adds complexity compared to ground-level designs, the benefits often outweigh the extra effort, especially in areas prone to flooding or where ground predators are common.
4. Repurposed Shed-Style Coops
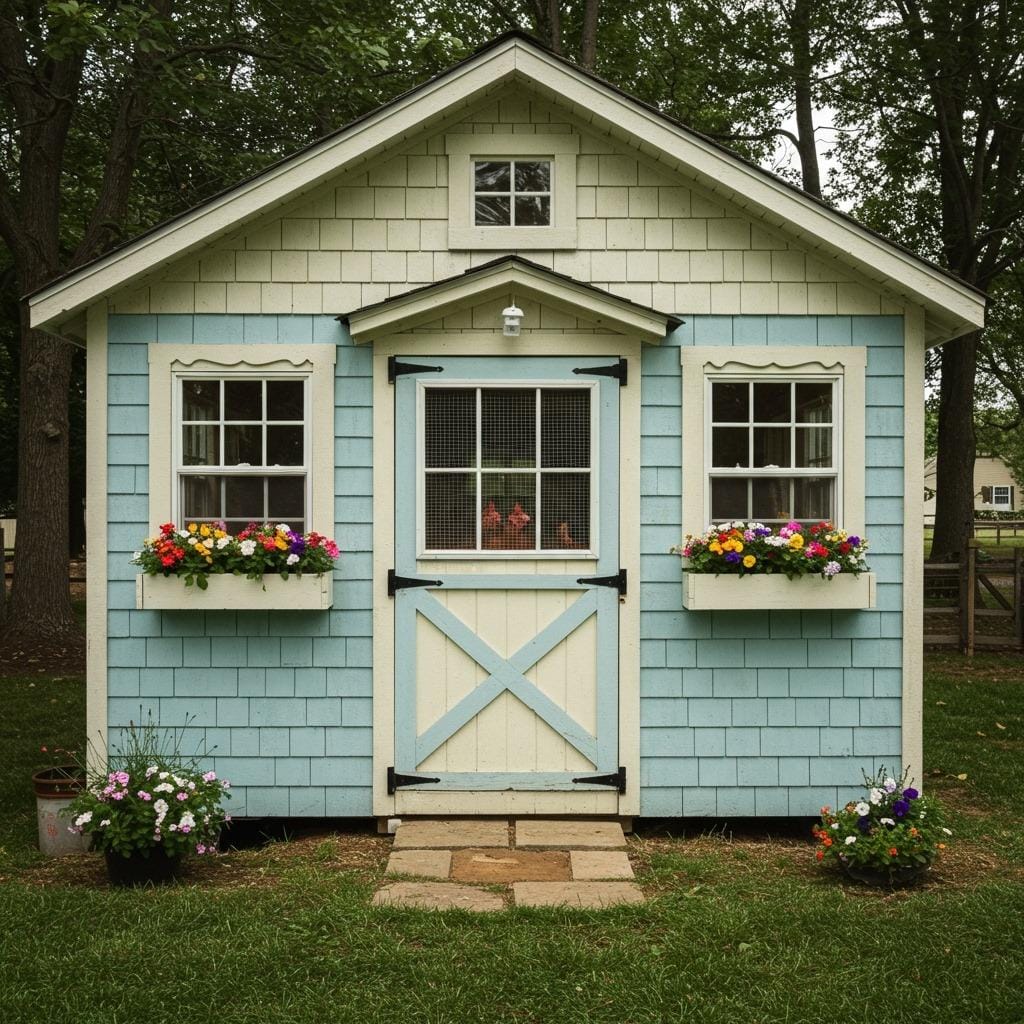
Converting existing structures or building shed-style coops offers excellent flexibility for customization and future expansion. These rectangular designs provide maximum interior space and allow for standard construction techniques that many DIYers find more comfortable than angled cuts required for A-frames.
The shed approach works beautifully when you want your coop to blend seamlessly with existing outbuildings or complement your home’s architecture. You can match siding materials, roofing, and trim details to create a cohesive look that enhances rather than detracts from your backyard patio makeover plans.
Interior organization becomes easier with straight walls and a standard peaked roof, allowing for multiple nesting boxes, roosting bars at different heights, and designated areas for feeders and waterers. The rectangular footprint also accommodates standard door and window sizes if you want to incorporate salvaged materials.
5. Mobile Chicken Tractor Plans
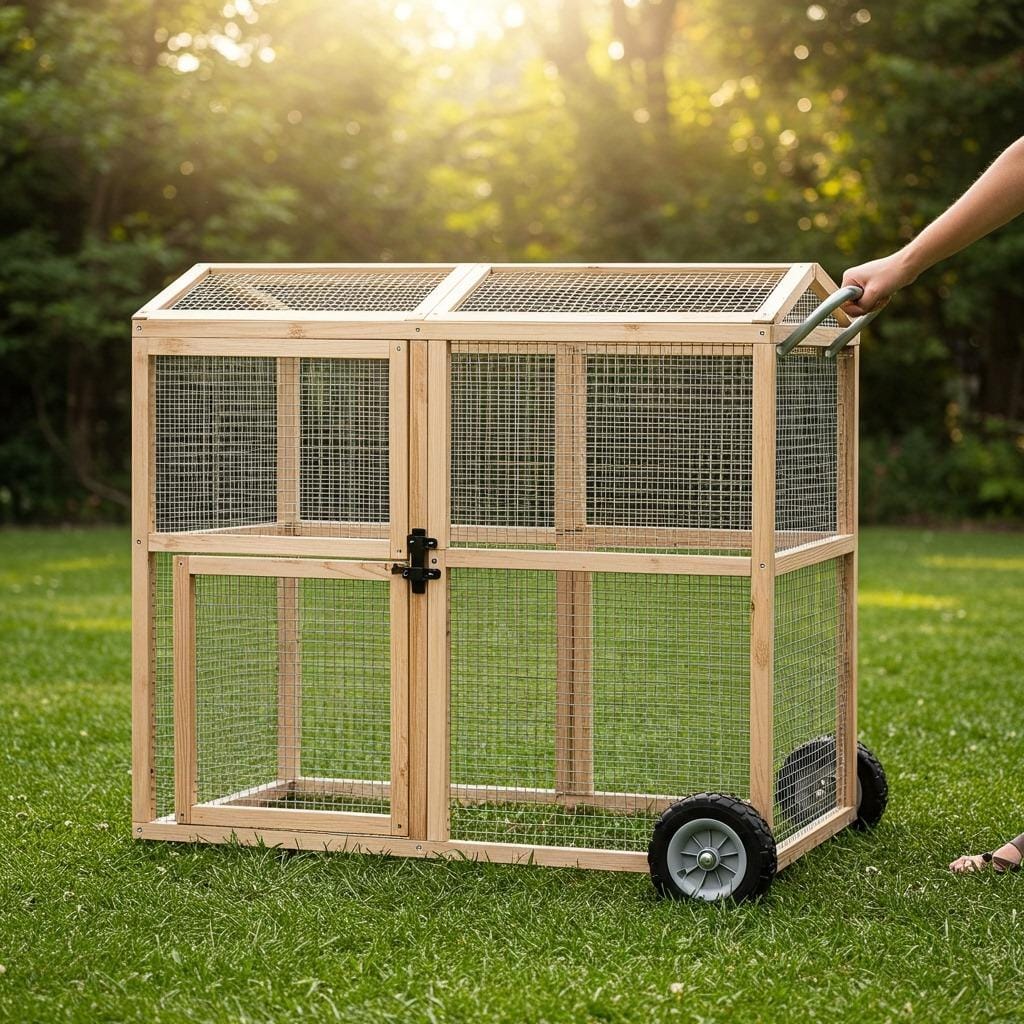
Mobile coops, often called chicken tractors, solve the challenge of maintaining healthy grass while giving your birds access to fresh ground regularly. These designs incorporate wheels or skids that allow you to move the entire structure, letting your chickens naturally fertilize different areas of your yard without creating bare patches.
The mobility factor requires careful attention to weight distribution and structural integrity since the coop needs to withstand regular movement while protecting your birds. Most successful mobile designs keep the footprint small and use lighter materials like plywood and 2×2 lumber rather than heavy 2×4 construction.
Weather protection becomes more challenging with mobile units since they typically feature more open construction for ventilation and visibility. Consider your climate carefully when choosing this style, and plan for supplemental shelter during extreme weather events.
6. Materials List and Cost-Saving Tips

Planning your material purchases strategically can significantly reduce costs while ensuring you have everything needed to complete your project. Standard lumber sizes work best for most DIY chicken coop plans, with 2x4s forming the primary framing and 2x2s serving for interior structures like roosting bars and nesting box supports.
Hardware cloth in 1/4″ or 1/2″ mesh provides the best security against predators, though it costs more than chicken wire. This investment pays off in protection – many coop failures result from using inadequate fencing materials. Plan for more hardware cloth than your initial calculations suggest, as you’ll likely need extra for repairs and modifications.
Roofing materials offer opportunities for creative savings, especially if you can source matching materials from other home improvement projects. Metal roofing provides excellent durability and weather protection, while shingles offer a more traditional appearance that might better suit your overall landscape design.
7. Step-by-Step Construction Timeline

Breaking your build into manageable phases prevents overwhelm and allows for course corrections along the way. Most weekend warriors can complete a small coop over 2-3 weekends, depending on design complexity and available time. Starting with a solid foundation – whether a permanent concrete pad or treated lumber base – sets the stage for everything that follows.
Framing typically takes the longest single session, requiring accurate measurements and square corners for everything else to fit properly. Having a helper during framing makes the process much easier and safer, especially when working with longer pieces or trying to hold multiple components in position simultaneously.
The finishing phase includes installing siding, roofing, doors, and hardware – details that transform your basic structure into a functional, attractive chicken home. This stage offers the most opportunities for personalization and creative expression, from paint colors to decorative hardware choices.
8. Ventilation and Climate Control Essentials
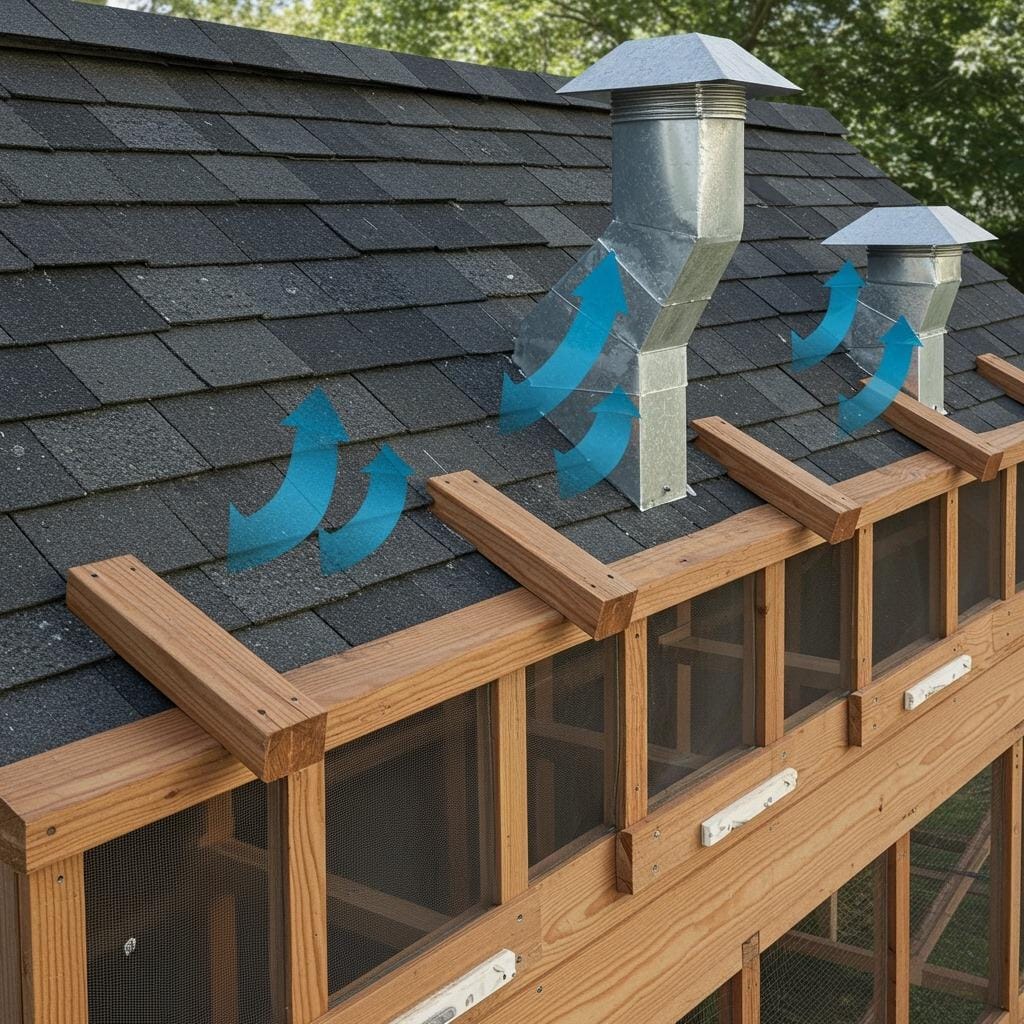
Proper ventilation might be invisible, but it’s absolutely critical for healthy, comfortable chickens and a successful coop operation. The general rule requires 1 square foot of ventilation per 10 square feet of floor space, positioned to create cross-breezes without creating drafts directly on roosting birds.
Ridge vents work excellently for allowing warm, moist air to escape naturally, while lower vents or windows provide fresh air intake. The key lies in creating airflow patterns that remove moisture and ammonia without creating cold drafts during winter months when chickens spend more time inside.
Summer cooling strategies become especially important in small coops where heat can build up quickly. Consider adding removable panels that can be swapped for extra screening during hot months, or incorporate small fans powered by solar panels for truly sustainable outdoor living.
9. Predator-Proofing Your Design
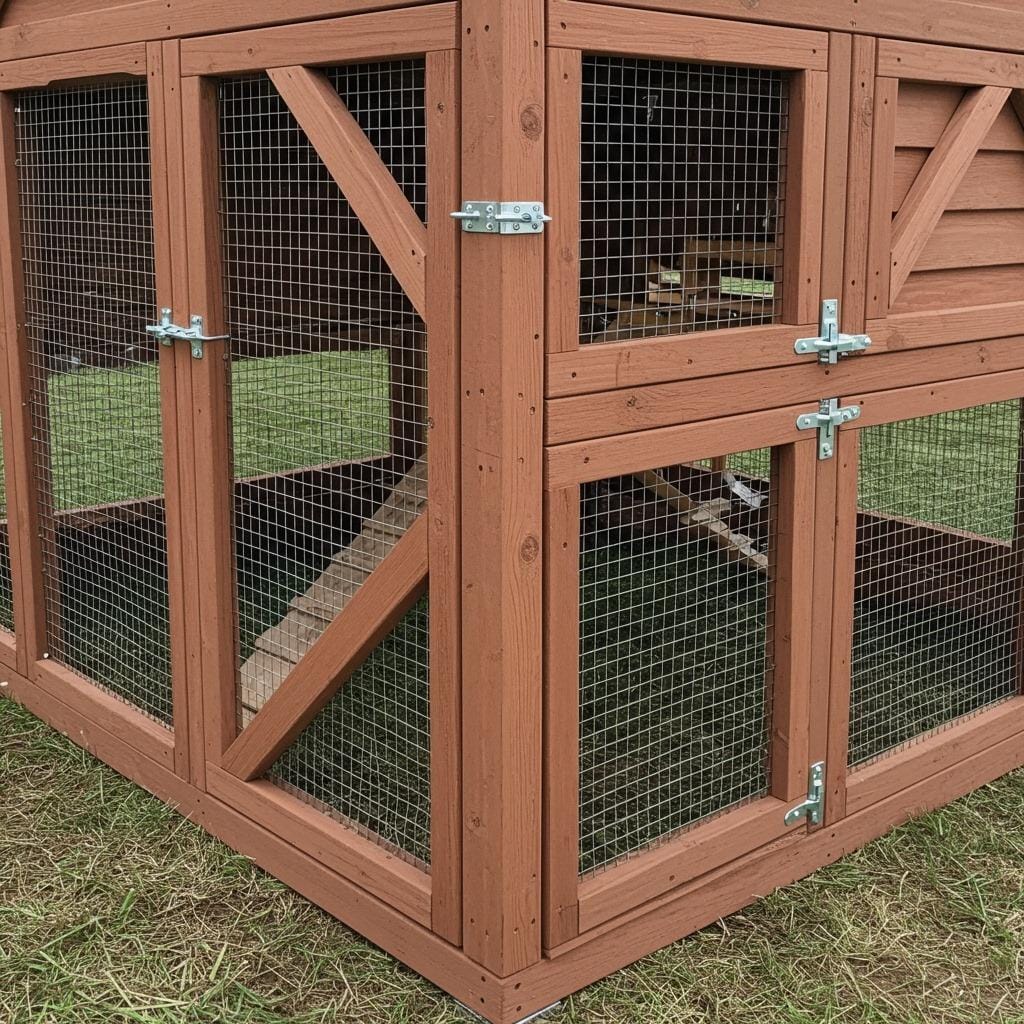
Even urban backyards harbor surprising predator populations, making security features non-negotiable rather than optional extras. Raccoons possess remarkable dexterity and problem-solving skills, requiring latches that challenge even human fingers – simple hook-and-eye closures won’t suffice for long-term security.
Underground protection prevents digging predators from tunneling into runs or under coop floors. Burying hardware cloth 12 inches deep around the perimeter or creating an underground “apron” extending 12 inches outward provides effective deterrence against determined diggers like foxes and dogs.
Overhead protection becomes necessary if your design includes an outdoor run, as hawks and owls pose aerial threats to chickens. Covering runs with hardware cloth or deer netting prevents most aerial attacks while still allowing natural light and rain to reach your birds.
10. Interior Layout and Nesting Box Design
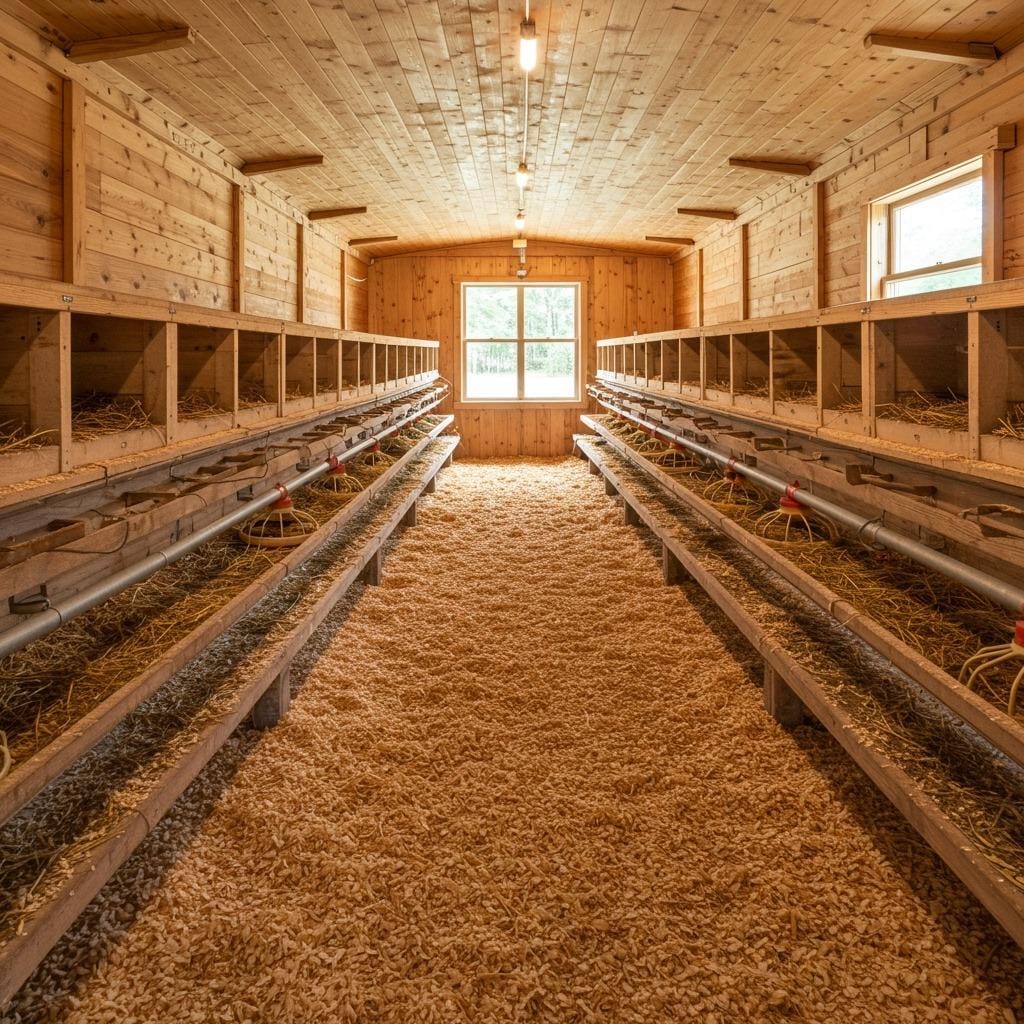
Interior organization maximizes your coop’s functionality while making daily care routines more efficient. Nesting boxes should be positioned lower than roosting bars to prevent chickens from sleeping in them (and creating messy conditions for egg laying). One box per 4-5 hens typically provides adequate space, though having a few extra never hurts.
Roosting bars need careful positioning to prevent chickens from perching directly above nesting boxes, feeders, or waterers. The bar itself should be 2 inches wide with rounded edges for comfortable gripping, positioned 18-24 inches above the floor with adequate space for chickens to hop up easily.
Easy cleaning access dramatically impacts your long-term satisfaction with chicken keeping, so plan removable floors, large doors, or hinged roof sections that allow you to reach every corner. Consider how you’ll remove soiled bedding and replace it with fresh material – awkward access makes routine maintenance much more burdensome.
Building your own chicken coop transforms a simple backyard into a productive, sustainable space that provides fresh eggs while connecting you with traditional homesteading skills. These plans offer starting points for creating something uniquely suited to your space, budget, and aesthetic preferences. Remember that chickens are remarkably adaptable creatures – focus on meeting their basic needs for security, shelter, and comfort rather than pursuing perfection. Your first coop doesn’t have to be your last, and many chicken keepers find themselves refining and expanding their setups as they gain experience. The most important step is simply getting started and learning through hands-on building.
Sanjai creates easy, affordable home decor ideas that anyone can try. Through simple tips and curated finds, he helps you style rooms you’ll love coming home to.