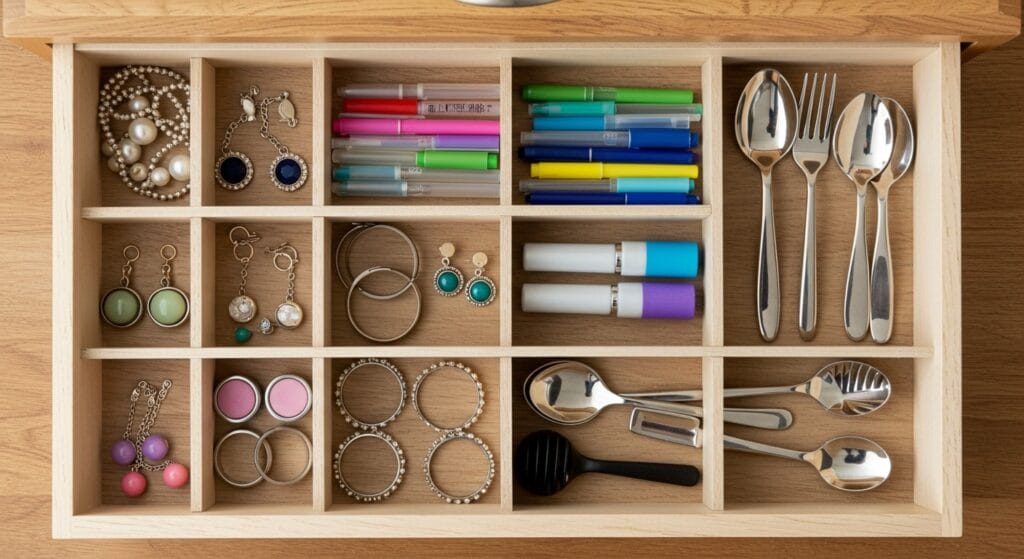
Staring at that one drawer that’s become a black hole for random stuff? You know the one – where hair ties mingle with charging cables, and finding anything feels like an archaeological dig.
The good news? Creating your own diy drawer dividers doesn’t require fancy tools or expensive materials. In fact, some of the most effective solutions are hiding in your recycling bin right now. These 10 clever ideas will help you reclaim every inch of drawer space, whether you’re tackling a cramped kitchen, overflowing desk, or that mysterious junk drawer everyone pretends doesn’t exist.
Let’s turn those chaotic spaces into organized zones that actually make sense.
Why DIY Drawer Dividers Beat Store-Bought Options
Most commercial drawer dividers follow a one-size-fits-all approach that rarely matches your actual storage needs. Your jewelry drawer has different requirements than your kitchen utensil drawer, right?
Making your own dividers means customizing every compartment to fit your specific items perfectly. Plus, you’re not limited to standard rectangular shapes – sometimes a circular section for hair scrunchies or an angled slot for phones makes all the difference.

The cost savings are pretty impressive too. A decent set of adjustable dividers can run $20-40, while most DIY versions cost under $5 to make.
1. Cardboard Box Method (The Classic)

This is probably the simplest drawer organization technique, and honestly, it works surprisingly well for lightweight items.
Save cereal boxes, shoe boxes, or any sturdy cardboard containers. Cut them down to match your drawer’s depth, then arrange them to create the perfect compartment sizes. For a more polished look, cover them with contact paper or fabric scraps.
The beauty of this method? You can test different layouts before committing to permanent solutions. Move boxes around until you find the perfect configuration for your storage and organization ideas.
2. Wooden Strip Grid System

If you’re comfortable with basic woodworking, this creates the most durable and professional-looking result.
Purchase thin wooden strips (usually 1/4 inch thick) from your local hardware store. Measure your drawer dimensions carefully, then cut strips to create a custom grid. The strips simply notch together – no glue or screws needed.
This method works exceptionally well for small kitchen cabinet organization where you need sturdy dividers for heavier items like serving spoons or gadgets.
3. Foam Board Flexibility

Foam board from the dollar store creates surprisingly effective dividers that you can cut with a regular craft knife.
Cut pieces to fit your drawer height, then create notched connections where dividers intersect. The foam is thick enough to stay upright but flexible enough to remove if you need to reorganize later.
This works particularly well for bathroom drawer organizer projects where you need waterproof materials that won’t warp from humidity.
4. Repurposed Container Magic

Before throwing away yogurt containers, takeout boxes, or small packaging, consider their drawer organization potential.
Different sized containers create natural compartment solutions for everything from office supplies to craft materials. The key is collecting various sizes over time, then playing drawer Tetris to find the perfect arrangement.
Small space hacks like this one prove that the best storage solutions often come from reimagining everyday items you already have.
5. Adjustable Elastic System

This creative approach uses elastic cord and small nails or adhesive hooks to create adjustable compartments.
Install hooks or small nails around your drawer’s perimeter, then string elastic cord between them to create a flexible grid. You can easily adjust the spacing by moving the cord to different hooks.
Perfect for drawers where your storage needs change frequently, like craft supplies or seasonal items.
6. Pegboard Insert Solution

Cut a piece of pegboard to fit your drawer bottom, then use pegboard accessories to create custom storage solutions.
This method excels for tool organization or craft supplies where you need vertical storage options. Small baskets, hooks, and holders designed for pegboard create incredibly versatile drawer organization.
The pegboard approach works especially well in garage storage solutions where you need heavy-duty organization for tools and hardware.
7. Interlocking Cardboard Design

This upgraded version of the basic cardboard method creates stronger, more permanent dividers using an interlocking system.
Cut slots halfway through each piece of cardboard, then slide them together to form a stable grid. The interlocking design distributes weight better than simple box placement.
For extra durability, reinforce the joints with clear tape or wrap the entire system in contact paper before assembly.
8. Sliding Tray Layers

Why settle for single-level organization when you can create multiple tiers in deeper drawers?
Build shallow trays that slide over each other, maximizing vertical space. Use thin plywood or sturdy cardboard for the tray bases, with small dividers creating compartments within each level.
This compartment solution works brilliantly for jewelry storage, where you can separate everyday pieces on top from special occasion items below.
9. Tension Rod Flexibility

Adjustable tension rods designed for closets work surprisingly well as drawer dividers for longer items.
Install rods perpendicular to the drawer length to create sections for things like kitchen utensils, makeup brushes, or pens. The adjustable nature means they’ll fit almost any drawer width.
According to organizing experts at The Container Store, tension rod systems rank among the most adaptable storage solutions because they require no permanent installation.
10. Modular Cube System

Create a set of identical cube-shaped dividers that can be arranged in countless configurations.
Cut squares of sturdy material (wood, plastic, or thick cardboard) and connect them using simple corner joints. The beauty lies in the infinite arrangement possibilities – stack them, line them up, or create custom patterns.
This modular approach particularly shines in small closet organization ideas where you need flexible solutions that adapt to changing storage needs.
Pro Tips for DIY Drawer Divider Success
Measure twice, cut once – seriously. Nothing’s more frustrating than dividers that don’t quite fit your drawer dimensions.
Consider the weight of items you’ll store. Lightweight dividers work fine for paper clips but won’t cut it for heavy tools or dishes. Match your material choice to your storage needs.
Leave a little wiggle room in your measurements. Drawers aren’t always perfectly square, and you’ll want space to remove dividers for cleaning.

Test your system before making it permanent. Live with cardboard prototypes for a week or two to ensure the layout actually works for your daily routine.
Making It Work for Every Room
Different rooms need different storage hacks for home organization, and your divider choice should reflect the space’s specific challenges.
Kitchen drawers benefit from easy-to-clean materials that won’t absorb odors or stains. Bathroom drawers need moisture-resistant options. Office drawers require precise sizing for specific supplies.
The most successful drawer organization happens when you match the solution to both the space and your personal habits. A system that looks Pinterest-perfect but doesn’t suit how you actually use your belongings won’t last long.

Remember, the best diy drawer dividers are the ones you’ll actually maintain. Start with one drawer, perfect your system, then expand to other spaces. Your future self will thank you every time you open a perfectly organized drawer and find exactly what you need right away.
Sanjai creates easy, affordable home decor ideas that anyone can try. Through simple tips and curated finds, he helps you style rooms you’ll love coming home to.