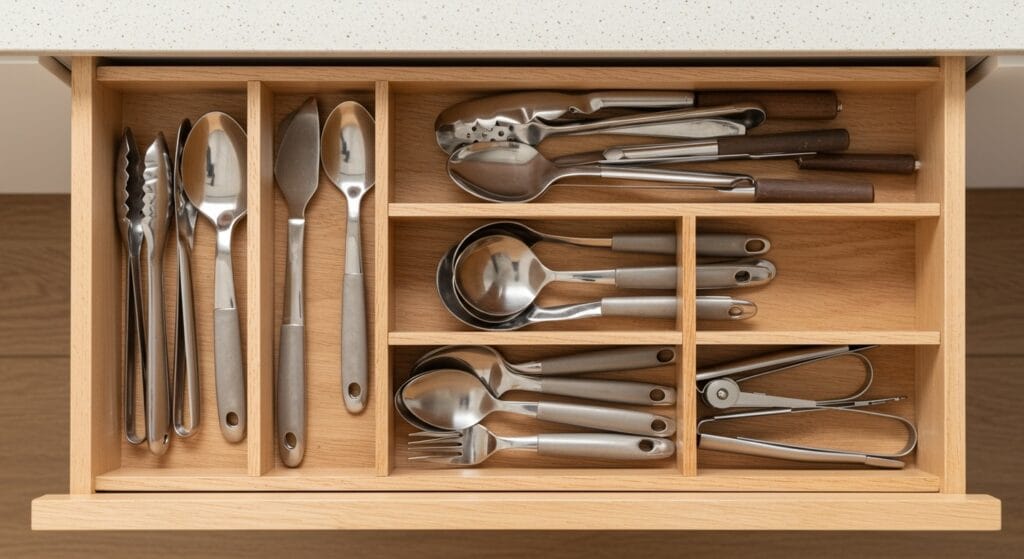
Are your kitchen drawers a chaotic mess of tangled utensils and scattered gadgets? You’re definitely not alone. Most of us have that one drawer where everything goes to hide – and finding the right spatula becomes an archaeological dig through layers of kitchen tools.
Building your own in-drawer kitchen utensil organizer tutorial might sound intimidating, but it’s actually one of the most satisfying weekend projects you can tackle. Custom organizers fit your exact drawer dimensions and specific utensil collection, something store-bought versions rarely achieve. Plus, there’s something deeply satisfying about opening a drawer and seeing everything in its perfect place.
Why Custom Kitchen Drawer Organization Makes All the Difference

Store-bought organizers rarely fit perfectly, leaving awkward gaps or forcing you to cram utensils into spaces that don’t quite work. When you create your own solution, you’re designing around your actual cooking habits and the tools you use most often.
Think about it – do you really need six tiny compartments for tea spoons when you’d rather have one large section for your collection of wooden spoons? Custom kitchen drawer organization lets you prioritize the utensils you actually reach for daily.
The best part? You probably have most of the materials already sitting in your garage or craft room. This project typically costs under $20 and takes just a few hours to complete.
Essential Materials and Tools You’ll Need

Gathering the right supplies beforehand makes this utensil storage ideas project flow smoothly from start to finish. Most hardware stores carry everything on this list, and you might already own several items.

Materials needed:
- Plywood or hardboard (1/4 inch thick works perfectly)
- Wood strips (1/2 inch x 3/4 inch pine strips)
- Wood glue (Titebond or similar quality brand)
- Sandpaper (120 and 220 grit)
- Wood stain or paint (optional for finishing)
- Small finishing nails (3/4 inch length)
Tools required:
- Tape measure (essential for accurate sizing)
- Miter saw or hand saw (for cutting strips to length)
- Drill with bits (for pilot holes)
- Small hammer (for nails)
- Clamps (helpful but not absolutely necessary)
Step 1: Measuring Your Drawer Like a Pro

Accurate measurements make the difference between a perfect fit and a frustrating near-miss. Remove everything from your drawer and give it a thorough cleaning first – you’ll be surprised how much crumb debris accumulates over time.
Measure the interior width, depth, and height of your drawer. Write these numbers down clearly because you’ll reference them multiple times throughout the project. Don’t assume your drawer is perfectly square – many older homes have drawers that are slightly off.
Check if your drawer has any interior mechanisms that might interfere with your organizer. Some drawers have metal slides or brackets that extend slightly into the interior space. Storage ideas for small homes often involve working around these kinds of spatial challenges.
Step 2: Planning Your Compartment Layout

This step separates functional organizers from ones that look pretty but don’t actually improve your daily cooking routine. Lay out all your utensils on your counter and group them by size and frequency of use.
Your most-used items – maybe a couple of wooden spoons, your favorite spatula, and essential measuring spoons – deserve the most accessible spots. Less frequently used specialty tools can occupy smaller or less convenient compartments.
Sketch your layout on paper, including approximate dimensions for each section. Don’t overthink this part – you can always adjust compartment sizes slightly during construction. The goal is creating a general roadmap for your cuts.
Step 3: Cutting Your Base and Dividers

Start by cutting your base piece to fit your drawer dimensions, minus about 1/8 inch on each side for easy insertion and removal. This small gap prevents the organizer from binding if your drawer isn’t perfectly square.
Cut your divider strips based on your planned layout. Remember that some strips will run the full width or depth of your organizer, while others will fit between intersecting dividers. Label each piece with masking tape to avoid confusion during assembly.
Consider the thickness of your divider strips when calculating lengths – each intersection reduces the available space by the width of the crossing divider. Most kitchen and dining ideas benefit from this kind of precise planning.
Step 4: Creating Perfect Notches for Intersections

Here’s where many DIY kitchen organization DIY projects get tricky, but with the right approach, it’s actually quite straightforward. Your dividers need to intersect seamlessly, which means cutting notches exactly halfway through each strip where they’ll cross.
Mark your notch locations carefully on both intersecting pieces. The notches should be exactly the same width as your divider strips and exactly half the height of the strips. Test-fit your pieces frequently to ensure tight, clean joints.
Use a fine-toothed saw for these cuts – precision matters more than speed here. Sand each notch smooth after cutting to remove any rough edges that might prevent proper assembly.
Step 5: Assembly and Gluing Techniques

Dry-fit your entire organizer before applying any glue. This test run reveals any measurement errors or tight spots that need adjustment. Once you’re satisfied with the fit, disassemble and prepare for final assembly.
Apply a thin, even layer of wood glue to all contact surfaces. Work quickly but methodically – you have about 10-15 minutes before the glue starts to set. Start with your longest dividers and work toward shorter pieces.
Use small clamps or heavy books to hold joints tight while the glue cures. Wipe away excess glue immediately with a damp cloth – dried glue spots are much harder to remove later and will show through stain or paint.
Step 6: Sanding and Finishing Options

Once your glue has cured overnight, sand the entire organizer starting with 120-grit sandpaper to smooth rough spots and even out joints. Follow with 220-grit for a smooth finish that won’t snag kitchen towels or scratch utensils.
Pay special attention to the tops of your dividers – these surfaces will see the most contact with utensils going in and out of compartments. Round over sharp edges slightly with sandpaper for a more professional look and feel.
Consider your finishing options based on your kitchen’s style. Natural wood looks beautiful with just a clear protective coat, while painted organizers can match your drawer interiors. Simple kitchen styling often emphasizes clean, unadorned wood finishes.
Step 7: Installation and Load Testing

Before loading your new organizer with utensils, test its fit in your drawer multiple times. The organizer should slide in and out smoothly without binding or rattling around loosely.
Check that your drawer still closes completely with the organizer in place. Sometimes drawers have slightly sloped fronts or backs that aren’t apparent until you add interior accessories. Minor adjustments can usually solve clearance issues.
Load your utensils gradually, placing heavier items first to test the organizer’s stability. A well-built organizer should feel solid and not flex or bow under normal loads. This is also a good time to fine-tune your compartment assignments based on actual use.
Troubleshooting Common Issues

Even experienced DIYers encounter occasional hiccups during kitchen organization projects. If your organizer fits too tightly, remove it and sand or plane the edges slightly – wood can expand in humid conditions.
Loose fits usually indicate measurement errors, but you can often solve this by adding thin strips of wood or foam padding along the sides. The organizer should feel secure without being forced into place.
Compartments that are too large for their intended utensils can be subdivided with additional strips. Too-small compartments might require removing a divider and creating a larger space. Remember, functionality trumps your original plan every time.
According to the storage hacks for home organization experts, the best organizers evolve based on actual usage patterns rather than theoretical ideals.
Creative Variations and Upgrade Ideas

Once you’ve mastered the basic technique, consider variations that match your specific cooking style. Deep drawers might benefit from multiple levels – create a removable top tray that reveals additional storage underneath.
Angled compartments work wonderfully for long-handled utensils like ladles and serving spoons. Cut your dividers at a slight angle so handles rest naturally without sliding around.
Some crafty DIYers add felt lining to their compartments, which looks elegant and protects delicate utensils from scratches. Thin cork sheets work similarly and are naturally antimicrobial.
Maintaining Your Custom Organizer
Regular maintenance keeps your organizer looking and functioning like new for years. Wipe down compartments monthly with a slightly damp cloth to remove oil residue and food particles that inevitably accumulate.
Reapply finish annually if you chose a stained or painted surface. Natural wood organizers develop a beautiful patina over time that usually needs no intervention beyond occasional cleaning.
Rearrange compartments seasonally as your cooking habits change – maybe you use more grilling tools in summer or baking utensils during holiday seasons. The beauty of custom small kitchen cabinet organization is its adaptability to your evolving needs.

Creating your own in-drawer kitchen utensil organizer tutorial project transforms one of your kitchen’s most chaotic spaces into a model of efficiency. The satisfaction of opening that drawer and immediately spotting exactly what you need makes every minute of construction time worthwhile.
This weekend project costs a fraction of premium store-bought organizers while delivering superior functionality tailored to your specific needs. Plus, you’ll have gained valuable woodworking skills that apply to countless other home organization challenges.Your perfectly organized utensil drawer will inspire you to tackle other kitchen organization DIY projects – maybe it’s time to design custom kitchen pantry storage hacks for your dry goods or create a better system for your spice collection.
Sanjai creates easy, affordable home decor ideas that anyone can try. Through simple tips and curated finds, he helps you style rooms you’ll love coming home to.